
This is an old revision of the document!
Table of Contents
102 Pen and Paper Adventure | Beta Age | Hunting an Unknown Hunter
SCENE 8b — THE JUDGMENT
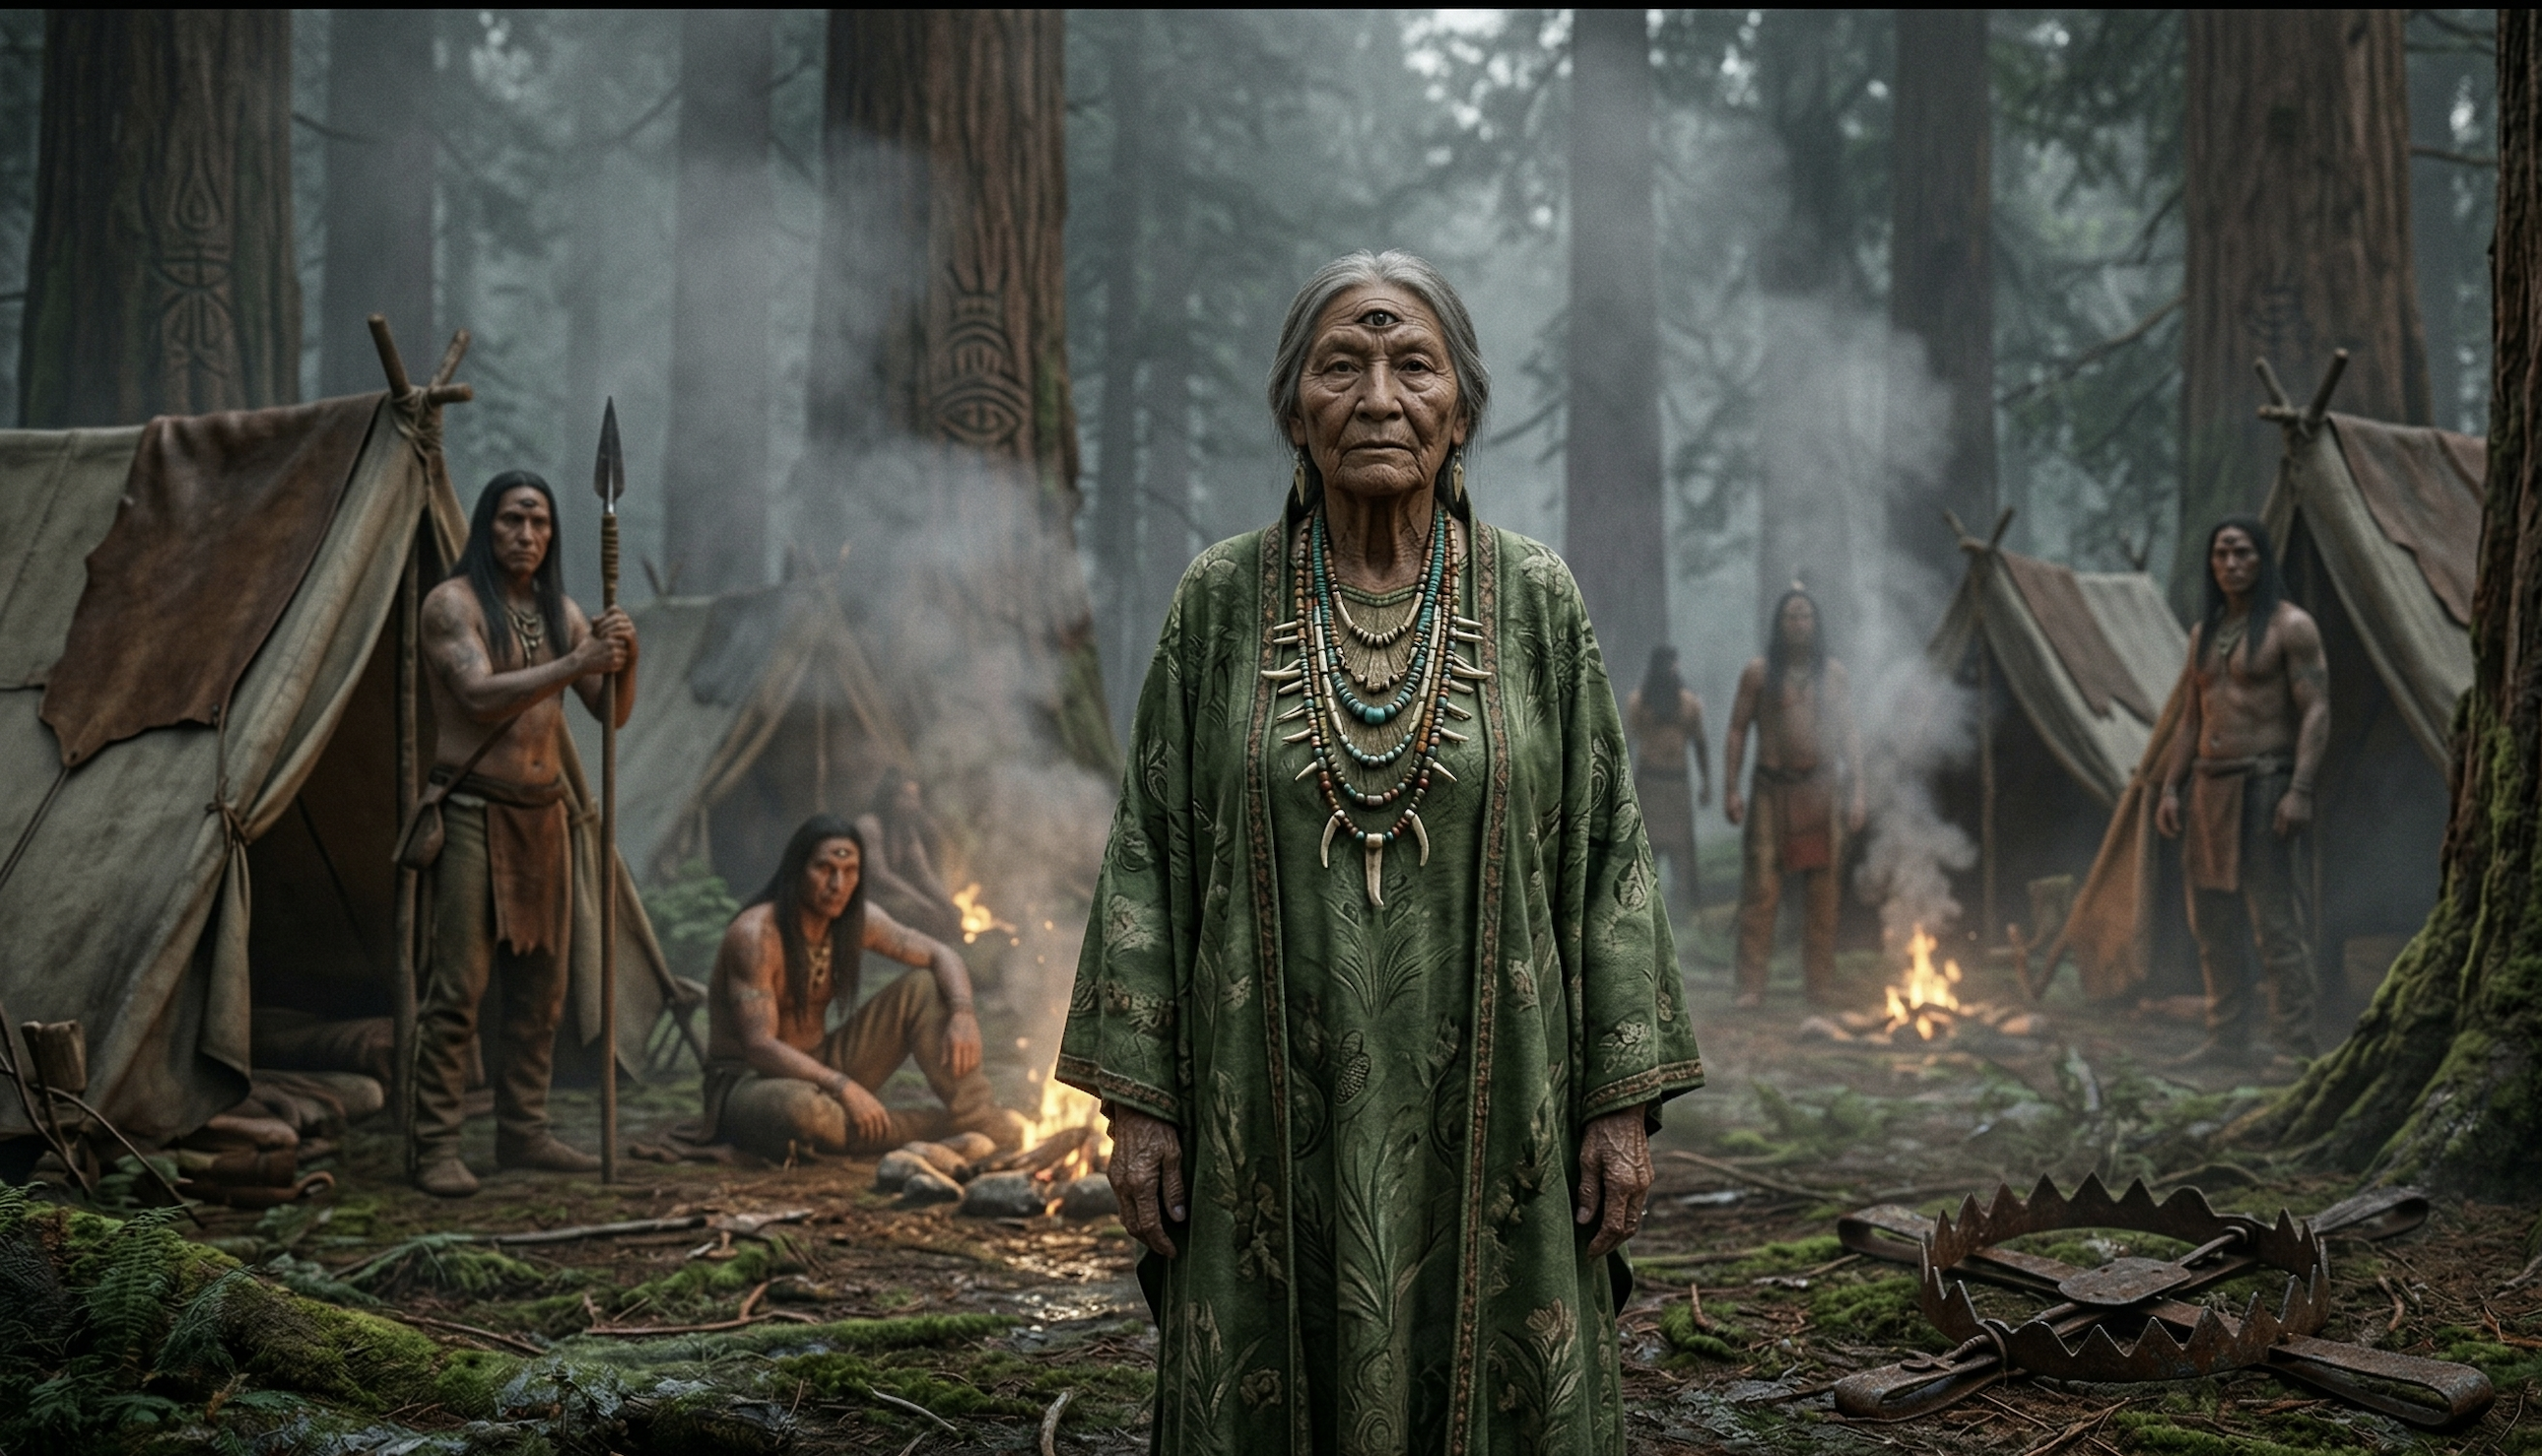
1 | Scene Overview
- Location: A temporary nomadic camp of the Honga Tribe deep in the forest in the lower Atrana Mountains, hidden just off the Trade Route.
- Type: Moral Dilemma · Cultural Confrontation · High-Stakes Combat
- Era: Beta Age
- Tone: Claustrophobic · spiritual dread · explosive violence
Atmosphere & Sensory Cues: The damp, mist-thickened air of the deep woods · the smell of wet moss, crushed ferns, and ash · J.W.'s frantic, hushed begging in the dark · the bone-chilling, heavy snap of rusted metal · the sudden roar of a Windstrike Rifle.
2 | Read-Aloud Descriptions
Initial Read-Aloud (The Cycle Camp)
The Honga scouts do not speak as they lead you off the Trade Route. Within seconds, the familiar path vanishes behind a wall of dense, grey mist and ancient timber. The unnatural silence of the forest presses in on you. Each scout watches you with two familiar eyes — and a third, open and unblinking in the center of the forehead, dark and reflective, fixed on you with unsettling focus. You cannot tell if it sees differently — only that it sees enough.
After a long march, the forest thins gradually, not into a village but into a living passage of color — a waypoint on the Honga’s endless migratory cycle along the Arla River. Light tents of layered, shimmering cloth hang between trees like river-skin caught in branches. Blues, greens, and soft amber hues breathe with the wind. Smoke rises in thin, disciplined threads from low fire pits.
The tribe watches in silence as you and your captive are shoved roughly into a damp, dark tent. The heavy canvas flap drops behind you, blocking out the pale light, and the silhouette of a spear-wielding guard takes up position outside. For the first time since you captured him, the silence in the room is broken not by you, but by Jareth Wyrick. The apex predator of the Atrana Mountains has been reduced to terrified prey. In the dark, his stoicism finally shatters. He is breathing heavily …
Then he suddenly clears his throat, and then — all at once, completely unexpectedly — the man who had previously only communicated with you via notes speaks to you. “What's wrong?” he asks in broken English with a heavy French accent. “What we do now?”
Staged Read-Alouds (Progressive Descriptions)
| Trigger / Timing | Read-Aloud / Narrative Insert |
| The Judgment (Phase II - If the PCs have NOT met Aruṋa before) | You are pulled from the tent and dragged into the center of the camp. The warriors part silently as an older woman steps forward. Her garments carry the colors of river and leaf. The markings on her skin are deeper than the others’, worn smooth by years rather than paint. Her third eye is traced in pale ash, its edges sharp and deliberate. She studies you for a long moment — not counting faces, but weighing presence. “Vena tum.” (Nature is wounded.). At her gesture, a scout approaches, carrying a bundle wrapped in bark-fiber cloth. He kneels and unrolls it at her feet. A crude trap spills onto the ground. Bent metal jaws are bound to a springed branch with wire and vine, the teeth hammered unevenly into place. Dried blood stains the metal dark and tacky. A strip of coarse fur still clings between the jaws, torn free rather than cut. As it settles, the mechanism snaps once — sharp, final, wrong. Two letters are engraved on the left side of the trap: J.W. The woman does not look down at it. She looks at you. “Wuxo kumo.” (Traps for siblings.) Her hand closes slowly. “Asa ara.” (Eating death.) A pause. Long enough for the forest to listen. Then she speaks again, her voice neither raised nor cruel. “Rena vena nai omba.” (Blood has broken the balance.) She gestures toward the trap. “Veyo-zi to.” (Cause follows.) Her third eye fixes on you. “Rena pi ara, rena pi vena. Shai di vai asa ara nai. Nai asa. Rena pi. Nai moru. Gno-sei.” (To restore what was taken, blood must answer blood. One of you will step where death waited. Not to die. To bleed. To remember.) Silence settles, heavy and expectant. “Quro nai.” (Questions come later.) |
| The Judgment (Phase II - If the PCs DID meet Aruṋa in Scene 3b) | You are pulled from the tent and led into the center of the camp. The warriors part silently as Aruṋa steps forward. Her garments carry the colors of river and leaf, and her pale ash third eye fixes immediately upon you. She studies you for a long moment, then shifts her gaze to the bound, sweating man you have brought before her. At her gesture, a scout unrolls a bark-fiber cloth at her feet. The crude, rusted jaw-trap spills onto the ground. Dried blood stains the metal dark and tacky, and a strip of torn, coarse fur clings to the teeth. The engraved letters 'J.W.' face upward. As it settles, the mechanism snaps once — sharp, final, wrong. Aruṋa does not look at the trap. She looks at J.W., then nods slowly to you. “Kato-zi.” (The pact is kept.) “You bring the death-maker to the forest.” She raises a long, ash-marked finger, pointing directly at J.W.’s chest. “Vena tum.” (Nature is wounded.) “Rena vena nai omba.” (Blood has broken the balance.) She lowers her hand toward the rusted jaws at her feet. “Veyo-zi to.” (Cause follows.) “Rena pi ara, rena pi vena.” (To restore what was taken, blood must answer blood.) Her voice is neither raised nor cruel; it is the absolute law of the woods. “He will step where death waited. Nai moru. Gno-sei.” (Not to die. To remember.) |
| The Ambush (Phase III) | (Read as the PCs leave the camp perimeter) You leave the safety of the Honga camp behind, the dense undergrowth immediately swallowing you whole. The mist is thick, clinging to the damp bark of the trees. Suddenly, a branch snaps. It isn't a native animal. The bushes ahead tear open as a massive Veyra bursts through the foliage. Valen Vanlith sits in the saddle, his scarred face twisted into a mask of absolute, fanatic rage. He raises his Windstrike Rifle. The hunt is over. |
3 | Scene Intent
| Scene Type | Player Intents | DM Function / Story Link |
| Moral Dilemma & Boss Fight | Extract the truth from J.W. · Navigate the Honga's demand for a blood sacrifice · Survive the final ambush by Valen's posse. | Pays off the promise made in Scene 3b. Breaks J.W.'s silence by putting him in a situation where his money and power are useless. Forces a brutal wilderness boss fight whose difficulty is directly dictated by the players' moral choices. |
4 | Key (N)PCs
| Name / Role | Motivation / Function | Dynamic Cues — How They React in Play | Link |
| J.W. — “The Hunter” | Desperate survival | Terrified of the Honga. He drops his arrogant persona and begs the PCs to save his legs, freely offering the truth to buy their protection. | Jareth Wyrick |
| Aruṋa (Honga Leader) | Restoring the balance | She is impartial, cold, and unyielding. She demands the trap-maker face the exact pain he inflicted on the forest. | Honga Tribe |
| Valen Vanlith | Fanatic vengeance | He has tracked the PCs to the camp's edge. He will fight to the death to save or avenge his boss. | Valen Vanlith |
| Mustafa Metzger | Cold precision | Uses the chaos of Valen's frontal assault to flank the PCs from the shadows. | Mustafa Metzger |
| Honga Warriors | Enforcers | They do not intervene in Exohuman conflicts, but they will relentlessly hunt the PCs if they try to disrespect the camp or flee mid-judgment. | Honga Tribe |
5 | Triggers, Clues & Consequences
Phase I — The Honga Cycle (The Camp & The Confession)
With the PCs and J.W. now sealed inside the guarded tent, their immediate physical state depends entirely on their past actions. If the PCs met Aruṋa in Scene 3b, their hands remain free as honored pact-keepers, though J.W. remains tightly bound. If the PCs have NOT met the Honga previously, they are treated as prime suspects — their own hands are tightly bound alongside their captive. Alone in the dark, the ticking clock of the outside world pauses just long enough for the Hunter to panic.
| Trigger / Cue (PC Action) | Immediate Reaction / What Happens | Clue / Consequence |
| PCs ask J.W. about him speaking (believing he was mute) | J.W. looks at them coldly, though his voice still trembles slightly. | Consequence: He replies, “Why reveal one's voice if it is not necessary?” |
| PCs reveal the Honga's intention (If met in Scene 3b) | J.W. pales, realizing he is about to lose a shin or a foot to his own rusted traps. He becomes highly agitated. | Consequence: Desperate to keep his legs, he suggests a deal: “What I can give you so that you try to escape?” |
| PCs admit they don't know what the Honga want (If NOT met in Scene 3b) | J.W. becomes visibly nervous, his breathing quickening. | Consequence: Fearing the worst, he suggests a deal: “Detention is never good sign. Waiting in detention never good idea. What I can give you so that you try to escape?” |
| PCs agree to J.W.'s deal | J.W. nods sharply, leaning in closer. | Consequence: The PCs can name one specific thing they want from J.W. in return for taking the risk to break them out (e.g., demanding the answer to a single question). |
| PCs ask their one question (as part of the deal) | J.W. weighs the cost of his secrets against his fear of the Honga. He answers truthfully, but provides as few details as possible. | Rule: The DM should use the Case Resolution to formulate the answer. Example: If asked why he killed the Nameless Man and targeted the PCs, he confesses: “I bear responsibility for great secret. Man you call 'Nameless' was my closest ally. But he became threat to secret, and so did anyone who came too close to him.” |
| PCs attempt to ask more follow-up questions | J.W. shakes his head stubbornly, refusing to elaborate further. | Consequence: He reminds them they agreed to a tit-for-tat deal. If they want more answers, they must fulfill their part of the bargain and get him out of the camp first. |
| PCs refuse the deal entirely | J.W. scowls, leaning back into the shadows of the tent. | Consequence: He shakes his head and mutters: “Si le risque est planifié, il ne peut pas être gagné. You are fools. I am also fool, caught by fools.” |
| PCs attempt an early escape from the tent | The guard at the entrance hears movement or spots them slipping under the canvas. | Consequence: If the PCs are bound, they must first quietly free themselves (DEX Sleight of Hand DC 14). Then, they must pass a group DEX (Stealth) probe (DC 15) or silently neutralize the guard. Success: They break out into the woods with J.W., bypassing the judgment entirely (Proceed to Phase III, State B). Failure: The camp is alerted. Dozens of spears are leveled at them, and they are dragged roughly before Aruṋa. |
| PCs wait it out | After several minutes, the tent flap is thrown open. | Consequence: Four warriors pull the PCs and J.W. to their feet and march them into the center of the camp. Proceed to Phase II. |
—
Phase II — The Judgment (Optional)
This phase only triggers if the PCs decided to wait in the tent or failed their escape attempt in Phase I. While the PCs face Aruṋa's judgment in the center of the camp, Valen's posse has successfully tracked them to the perimeter. Vastly outnumbered by the Honga warriors, the heavily armed Veyra-riders remain completely hidden in the dense foliage, waiting for their moment to strike.
| Trigger / Cue (PC Action) | Immediate Reaction / What Happens | Consequences / Mechanics |
| Aruṋa demands a sacrifice (If PCs did NOT meet her in Scene 3b) | Aruṋa points to the trap. “Rena pi rena. Shai dalu ara melo?” (Blood must answer blood. Who steps where death waited?) | Consequence: The PCs are temporarily suspects. To save themselves, they must present J.W. and convince Aruṋa he is the true culprit (using his initials 'J.W.' on the trap, his confession, or a DC 14 Persuasion check). Once convinced, she turns her judgment to the Hunter. |
| Aruṋa demands the debt (If PCs DID meet her in Scene 3b) | Aruṋa nods to the PCs. “Tu bera kato.” (You honor the pact.) She points a long, ash-marked finger at J.W. | Consequence: The Honga recognize the debt is paid. The warriors immediately seize J.W. and drag him toward the rusted jaw-trap. |
| PCs attempt to talk Aruṋa out of the physical punishment | Aruṋa’s third eye narrows. “Vena nai yoro nai pi.” (The forest does not forgive without a price.) | Mechanic: A nearly impossible CHA (Persuasion) probe (DC 18). Success: The PCs offer something of immense, equivalent value as a substitute, satisfying the debt peacefully. Failure: The Honga grow hostile and force the ritual to proceed. |
| PCs allow the ritual to proceed | J.W. struggles wildly, but the Honga warriors force him to the ground. | Consequence: The Honga force J.W.'s leg into the rusted jaw-trap. It snaps with bone-crunching force. J.W. takes heavy piercing damage and gains the Crippled condition. He screams in agony. Immediately after, the warriors pry the trap open, staunch the bleeding, and bind his mangled leg with broad leaves and a pungent, natural ointment. With the debt paid, Aruṋa nods: “Veyo-zi to.” (The balance is restored). Proceed to Phase III, State A. |
—
Phase III — The Convergence (The Perimeter Ambush)
Valen Vanlith and his posse observed the initial arrest on the Trade Route and tracked the PCs to the Honga camp. Outnumbered, they waited in the dense foliage just outside the camp's perimeter. Phase III triggers the moment the PCs leave the camp (or attempt to flee from it).
| Trigger / State | Immediate Reaction / The Posse Strikes | Consequences / Mechanics |
| State A: J.W. is Crippled (The Ritual Finished) | As the PCs carry the bleeding J.W. away from the camp, the undergrowth explodes. Valen and his men ambush them. | Consequence: Seeing his boss crippled, Valen goes completely berserk. The PCs face a deadly fight. If defeated: The posse beats the PCs into submission. Valen furiously orders them bound and dragged back to the compound. Proceed to Scene 6b — As a Prisoner in the Realm of the Hunter. |
| State B: PCs fled and are pursued by the Honga | While running desperately from Honga spears, the PCs run headlong into Valen's hidden perimeter line. | Consequence: The difficulty spikes massively. The PCs are pinned between Valen's ambush and the pursuing Honga. Escape is highly unlikely. If caught by the Honga: They are dragged brutally back to Aruṋa for immediate punishment. If caught by the Posse: They are subdued and hauled back to the compound. Proceed to Scene 6b. |
| State C: PCs talked Aruṋa out of the punishment | The PCs walk away with an unharmed J.W., only to find Valen's Veyras blocking the forest path ahead. | Consequence: A standard tactical battle ensues. However, J.W.'s attitude has shifted. If defeated: Valen prepares to execute the PCs, but J.W. raises a hand. Recognizing the PCs saved his legs (and his life) from the jaw-trap, he orders Valen to let them walk away. The PCs survive the encounter, but they lose their bounty and fail the mission. |
| The Posse is defeated or evaded | The forest falls quiet. The remaining threat is neutralized or left behind. |
6 | DM Notes
- The Great Reveal (J.W.'s Voice): Play up the absolute shock of J.W. speaking. For the entire adventure, he has been a silent, arrogant wall of muscle. When he finally opens his mouth, make sure the heavy French accent and broken English contrast sharply with his former stoicism. In that dark tent, let the players hear him sweat, beg, and bargain. The forest breaks Exohuman laws.
- Information Control: J.W. is desperate, but he is still a master manipulator. When the PCs ask their “One Question” as part of the deal, give them a truthful but strictly limited answer. Use the Case Resolution page to formulate the answer, but do not give away the entire plot for free. He gives them just enough to satisfy the bargain.
- Portraying Aruṋa: Aruṋa should not sound angry, malicious, or vindictive. She is executing natural law. Deliver her Honga dialogue slowly, with heavy, expectant pauses. The horror of the ritual comes from how calm and inevitable it feels to the tribe.
- The Standoff Mechanics: In Phase III (State B), make sure to clearly describe the three-way chaos. Valen is shooting at the PCs, the Honga are throwing spears at anyone in their way. The players don't necessarily have to kill everyone — they just need to survive long enough to escape the crossfire.
- The Return to 8a: Remember that this scene is a detour! Once the bloody business with Valen is concluded at the perimeter, the PCs still have to limp back to civilization. Send the DM directly back to Phase III of Scene 8a.
DM Tutorial: How to approach the scene
Related Pages and Further Information
- ↑↑ Start: Hunting An Unknown Hunter
- ★ Overview: All Scenes of Hunting An Unknown Hunter
- ☞ Resolution: Case Resolution and discoverable Backstory
- ← Previous Scene: Scene 8a — Return to New Kourou (Phase I & II)